 PhotoCraftTools
PhotoCraft field guide
Export a PNG from PhotoCraft
This guide uses PhotoCraft Web v0.6.0 and our PSD and PNG practice files.Editing is recommended on a desktop browser.
Download the example, open the editor, then use File > Open inside it.
- If you are editing text, finish by clicking the checkmark in the editor toolbar. For a PNG brush exercise, finish your stroke before exporting.
- Choose File > Export > Quick Export as PNG inside the editor.
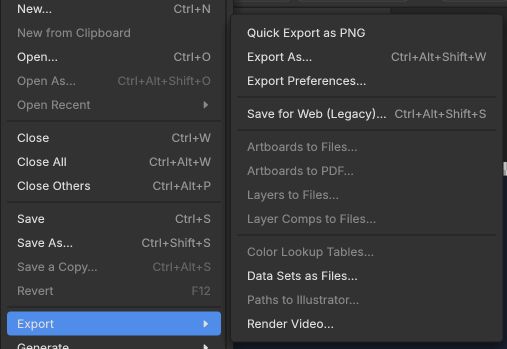
Choose the first command in the Export submenu. - Use your browser's download list to locate the image. Browser settings may ask for a destination.
- Open the downloaded PNG and check its dimensions, transparency and visible edits. A click on the export menu alone does not prove the file was saved.
Try the PNG exercises
Download a PNG from the practice collection, then choose File > Open inside PhotoCraft. For the invitation, press B to choose Brush and drag beneath the date. The black underline in our example uses the default brush. Check that your mark is visible without covering the words, then follow the export steps above.
For the star badge, export without editing. The input already contains transparent corners and translucent rings. Compare the downloaded image on light and dark backgrounds: the corners should show the background and the rings should blend with it. A checkerboard in an image viewer is a display aid, not part of the exported artwork.
Before you leave
Save or export inside the editor before refreshing, changing renderer or closing the workspace. This site does not automatically save documents or restore them after a confirmed departure. The guide checkboxes in the workspace are your own confirmation.
Troubleshooting
If the editor does not start, keep its internal message visible. Use the workspace's reload option or try WebGL mode after saving your work. If fonts look wrong, use the supplied Inter text example first. Complex layer effects, smart objects and other fonts are outside these tests.
Open PhotoCraft